
How to Add Payment Gateway to WooCommerce
Quick and convenient online payments are critical to any good online shop. Thus, business owners must add secure Payment Gateways to their eCommerce websites. There are many ways to add a Payment Gateway (or two) to your WooCommerce or Shopify site. Here, we’ll focus on setting up the gateway on the WooCommerce platform.
There are many pros and cons to Online Payment. But, the popularity of online stores makes it crucial for shoppers to pay for their purchases through various methods. These days, processing online payments is a critical feature of eCommerce websites.
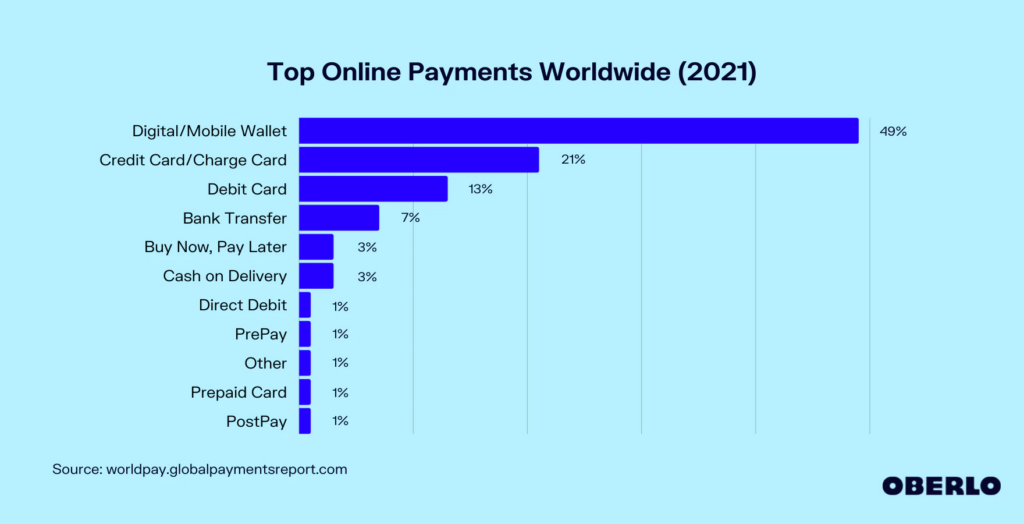
Source: Oberlo.
Among the many eCommerce Platforms today, the most popular ones include WooCommerce and Shopify. Because of their prominence, an eCommerce Website Developer in the Philippines can incorporate online Payment Gateways. Thus, they ensure your website can process online shoppers’ payments.
Why Add a Payment Gateway to Your WooCommerce Website?
For your WooCommerce site to process customer payments, you need electronic Payment Gateways, such as credit cards. In addition, consumers use digital wallets, bank transfers, and even PayPal to make their purchases.
Your Payment Gateway will determine transaction fees, the kind of currencies your site can process, and how fast you receive payments. Not only that, it can improve your online shoppers’ checkout experience. Some of the popular Payment Gateways for eCommerce sites include:
- PayPal
- Stripe
- Authorize.net
These Payment Gateways can also be used in Payment-Integrated WordPress Registration Forms. For eCommerce websites, payment integration is necessary to cater to online shoppers. Fortunately, WooCommerce allows plenty of eCommerce-related functionality to your site with the help of its plugins.
Thus, business owners can add a Payment Gateway to their WooCommerce website with the help of WooCommerce Payments.
Before Installing the WooCommerce Payments Plugin
Again, WooCommerce offers various functionalities to improve your eCommerce website. For example, WooCommerce allows an eCommerce Website Developer in the Philippines to add the following:
- Product Details or Descriptions;
- Create Coupon Codes; and
- Checkout pages.
Also, WooCommerce Payments is an integrated payment solution for eCommerce websites. With this extension, you won’t need to worry about gateway setup costs or monthly fees.
Here are the Payments extension’s features:
- Accepts credit and debit cards.
- Accepts local payment methods.
- Automated bank account deposits.
- Multi-currency support.
- Integration with digital wallets.
- Payment management from your dashboards.
So if you have a WooCommerce website, using the Payments plugin is recommended. An eCommerce Website Developer in the Philippines can add a Payment Gateway in WooCommerce for you. But before that, you need to prepare a few things:
WooCommerce Payments Installation Requirements
Before you add a WooCommerce Payment Gateway to your website, you must meet a few requirements for a smooth installation:
- First, your online business should be based in any of WooCommerce’s supported countries. These include the United States, the United Kingdom, Canada, Australia, etc.
- Also, you should be processing WooCommerce’s supported currencies.
- The most recent version of WordPress. To check whether you have the latest version of WordPress, go to the Updates page on your Dashboard.
- The most recent version of WooCommerce. You can check the version via Installed Plugins under the Plugins section.
- The latest version of the PHP programming language. Check its version in the Site Health section under Tools, then go to Info and then Server.
- Lastly, you need an SSL Certificate.
Once you’ve prepared all these requirements, you must check if you’ve installed WooCommerce Payments. You can accomplish this by going to the Installed Plugins section and checking if WooCommerce Payments is listed there.
WooCommerce Payments Installation
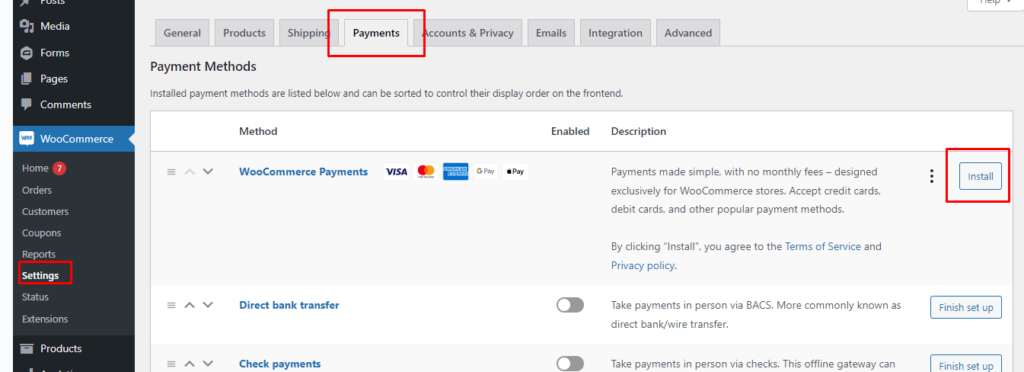
If WooCommerce Payments hasn’t yet been installed, you can start by going to the WooCommerce section and clicking Settings. Under the Payments tab, you’ll see a list of all the available Payment Methods, including WooCommerce Payments. Simply click the ‘Install’ button to start the WooCommerce Payments installation process.
Alternatively, you can click Add New on your WordPress Plugins section. Search for the WooCommerce Payments plugins and click ‘Install Now.’ This will start the installation process.

Source: WooCommerce.
Once done, the ‘Install Now’ will change to an ‘Activate.’ Clicking the button will finish the setup process. You’ll then be redirected to the WooCommerce Payments signup process.
Signing Up to the WooCommerce Payments Plugin
Finish the WooCommerce Plugin Setup

Upon installing and activating the WooCommerce Payments, you can select ‘Finish Setup.’ Doing so will start the signup process. From here, WooCommerce will need you to connect your WordPress.com account and enter critical information concerning you and your business.

For relevant business details, you must provide your date of birth, Social Security number, or tax ID. Then you must also include your bank account information for receiving deposits. If your business is based in the United States, you can add a debit card instead.
But, you may not always be able to change the bank account information once it’s been saved. So, using an account dedicated to your WooCommerce store is best.
Reminders Before Signup
- WooCommerce has a partnership with Stripe as its payments partner. Users will be redirected to Stripe’s website to finish signing up.
- Again, be careful during account creation, as you can’t change the account information after saving.
- eCommerce business owners in the United States can add a debit card to their bank account info. However, a bank account is still the better option for two reasons:
- Bank accounts don’t have a maximum amount to deposit in a single transaction. However, if you use a debit card, they usually have a limit of $10,000.
- Debit cards may not allow you to send refunds to customers. If your debit card account is in the negative, you cannot debit any more money.
Signing Up for WooCommerce Payments
From your Payments tab, you must select the ‘Finish set up’ button to enter your merchant or Business Email. That way, eCommerce store owners can connect to your WordPress.com account.
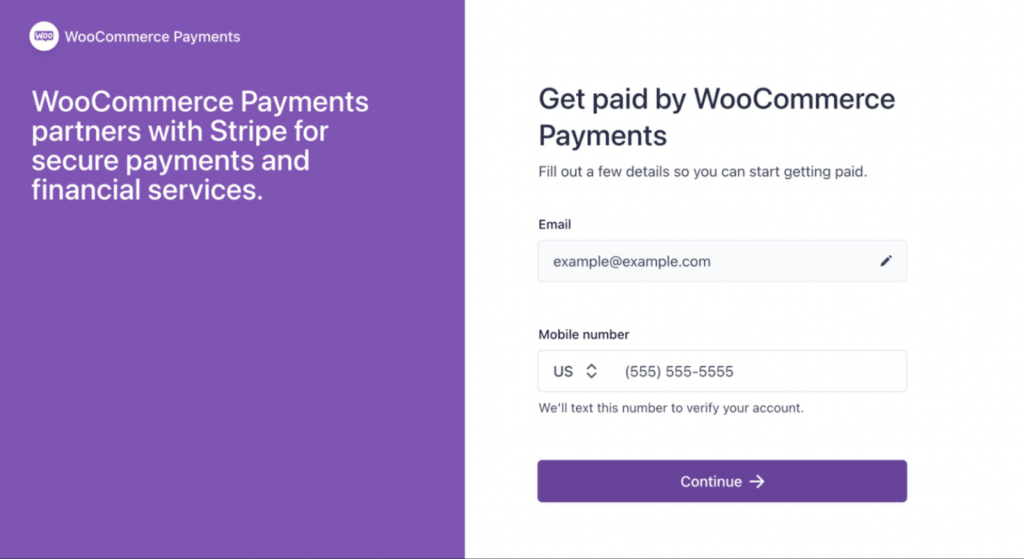
Source: WooCommerce.
Next, you’ll verify business details with Stripe, WooCommerce’s payments processor. After that, you can accept credit and debit card payments and receive payments via your provided account!
Configuring WooCommerce Payments
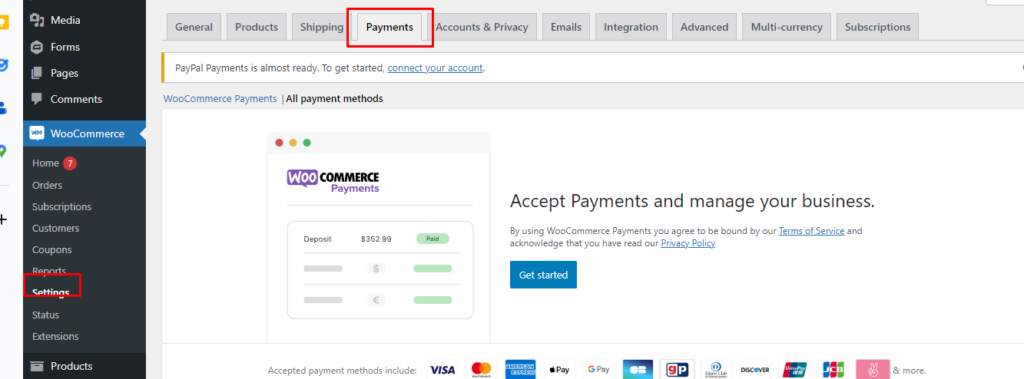
Once the signup process is done, you can head to the Settings section and your Payments tab. You can configure WooCommerce Payments from Settings.
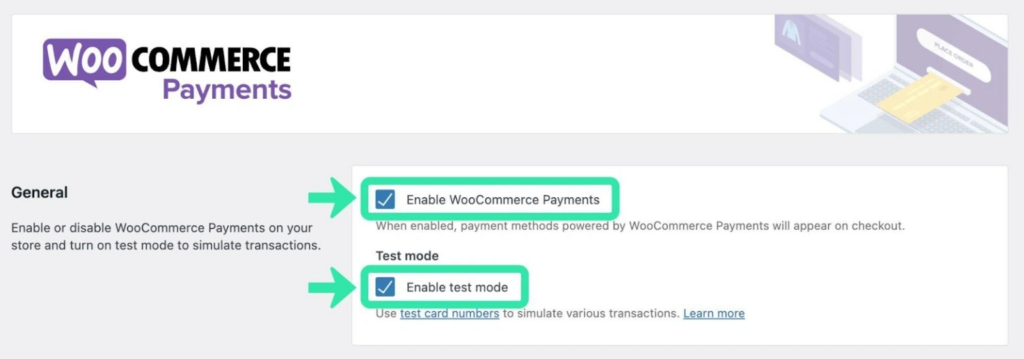
Source: WooCommerce.
But the first thing you must do is ensure WooCommerce Payments is enabled. You can accomplish this by checking the Enable WooCommerce Payments box.
Additionally, you can test the Payments plugin before you accept payments via the Enable test mode box.
WooCommerce Payments Test Mode
As the name indicates, the Payment plugin’s Test mode allows you to test payments. But before you can do test transactions, you should have created at least one item or product for your eCommerce shop. In general, it’s good practice to add Short Product Details to that item.
WooCommerce allows you to use test credit card numbers to simulate the checkout process and see how well it works. The platform only allows you to use test card numbers. Using real card information in Test mode will cause problems with the order.
So, online store owners can add a product to their cart and practice or test the checkout process! You’ll also be able to see an order confirmation page. As a result, business owners can see what shoppers see during the purchase process.
Lastly, to process live customer payments, you must disable Test mode.
Payments Accepted on Checkout
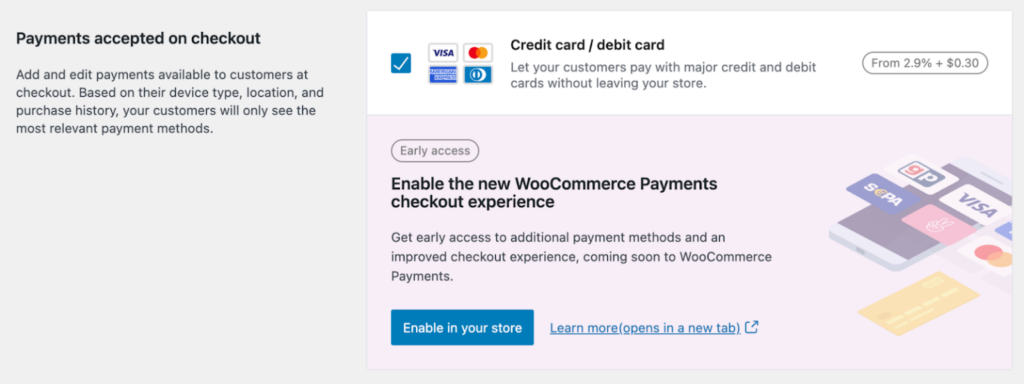
Source: WooCommerce.
When you check the Payments accepted on checkout section, you’ll see that you can accept card payments by default.
Express Checkouts

Source: WooCommerce.
In this section, you can see features that, when enabled, can improve your customers’ purchase experience. Express checkouts mean faster payments, increased sales, and reduced cart abandonment. For this section, WooCommerce supports Apple and Google Pay, and Link by Stripe.
Transactions and Deposits
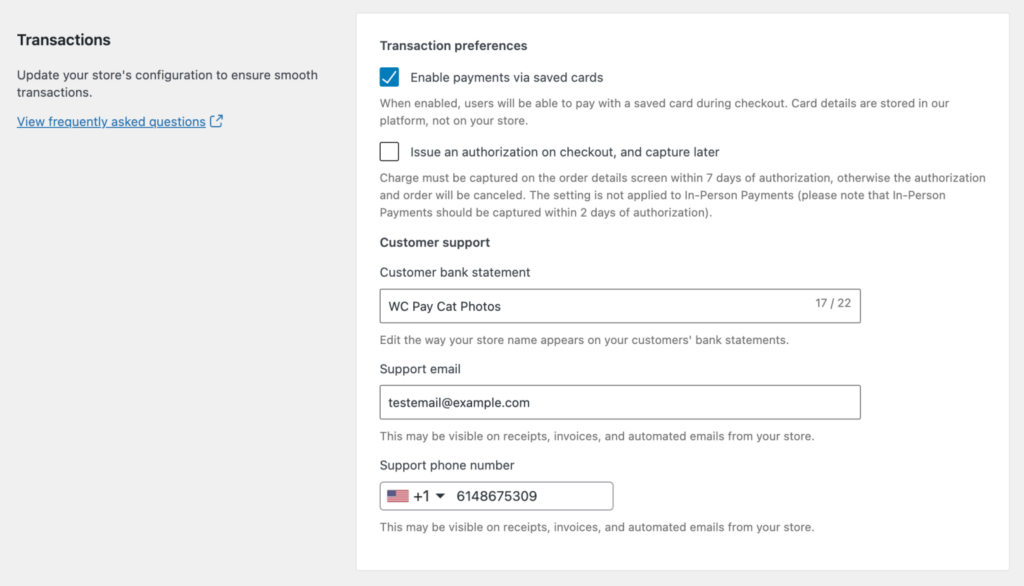
Source: WooCommerce.
In Transactions, you can control how your WooCommerce store checkout functions. For instance, an eCommerce Website Developer in the Philippines can set to allow shoppers to save their card information on the WooCommerce website. For cybersecurity reasons, it’s best not to allow this feature.
Instead, business owners should apply fixes to Website Security Vulnerabilities and keep their customers’ sensitive information safe from malicious individuals.
Also, you can configure how purchase charges will look on customers’ bank statements. Lastly, in the Transactions section, you can include your eCommerce business’ contact information. So, your listed contact details can appear on your website’s receipts and emails.

Source: WooCommerce.
As for the Deposits section, you can select how often the Payments plugin will deposit earnings into your bank account.
Final Thoughts
With consumers favoring online payments, your eCommerce website should have payment processing capabilities. Fortunately, the WooCommerce and Shopify platforms can assist with this. In particular, WooCommerce powers over “6,694,025 live websites,” making it a popular choice for online store owners. Not only that, but it offers the WooCommerce Payments extension.
Of course, to use it, business owners need a trusted Payment Gateway. Some of the best WooCommerce Payment Gateways include PayPal, Stripe, and Authorized.net. But your chosen gateway will have a hand in the following:
- your transaction fees;
- the currencies you can process; and
- the speed at which you can receive payments.
Here’s what the Payments extension or plugin can do for your online business:
- Accepts credit and debit cards and local payment methods.
- Automates bank account deposits.
- Supports multiple currencies.
- Integrates with popular digital wallets.
- Allows you to manage payments from your dashboard.
To collect online payments from shoppers, consult with the right eCommerce Website Developer in the Philippines.


Comment 0