
WordPress Thank You Page Creation: A Tutorial
It isn’t enough to impart essential information on your business or industry. You must infuse that informative copy with personality, too. Cheerful and polite speech can build a rapport with site visitors. So, companies must create or set up a Thank You Page on their WordPress websites.
Courtesy at all parts of the customer journey can go a long way. Thank You Pages, such as those made by a WordPress Developer from the Philippines, are a crucial tool in digitally marketing your business. Such a page is the last page of the customer journey or sales funnel. eCommerce Websites are one example of a business that needs such a web page.
A generic ‘thank you’ message isn’t as engaging as personalized messages expressing gratitude. These messages feel more natural, thus humanizing your brand while conveying to your customers how important they are to you.

The page can also boost your Conversion Rates and SEO! If every successful conversion action ends with a Thank-You Page, you can gain a 100% Open Rate.
Why Your Business Site Needs a Thank You Page
Your website is composed of various parts, including pages meant to explain your products or services. WordPress has multiple features that allow you to create a blog on your business site. Also, you can create many unique pages for a variety of purposes.
For instance, Contact Us Pages are necessary so interested customers can get more information about your products or services. WordPress also allows you to construct a Custom 404 Page for your website. Landing Pages are another way to gain consumers’ attention.
However, a Thank-You Page can boost conversions and brand loyalty. For example, they show a company’s appreciation to people for making a purchase or order. Or, they can also double as confirmation pages for actions like registering for a service or webinar.
Thank You Pages are also great when visitors opt-in to receive newsletters or promotional emails. Additionally, they can appear to people leaving their information via contact forms.
You don’t always need a developer to set up a WordPress Thank You Page. There are plenty of plugins for building specific pages, such as SeedProd. Thus, we’ll use this Website and Landing Page Builder to make the Thank You Page in this article.
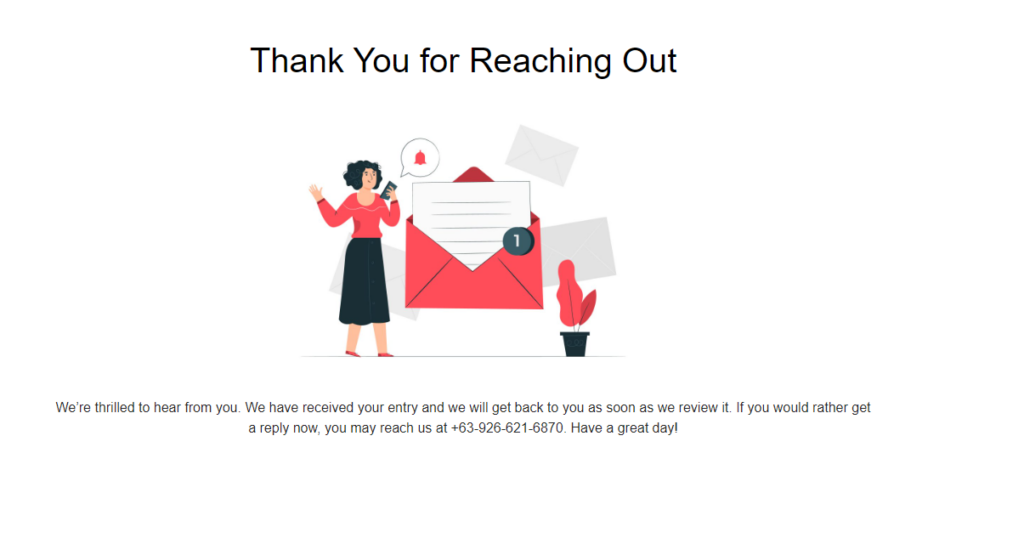
Creating a Thank You Page for WordPress Sites
Thank You Pages can increase your conversions, but you need to give them a lot of attention. After all, website owners should do better than adding a simple line thanking customers for doing a particular conversion action.
A detailed, content-rich page design will leave a good impression on visitors. This way, you can influence them to stay longer on your pages or return to your site. As a result, the page boosts your SEO efforts.
A Thank You Page on WordPress requires personalization. Thus, the content a WordPress Developer from the Philippines will add to your pages should reflect your brand’s personality.

Source: Accenture.
The content should interest the people who land on the Thank You Page. Shoppers prefer to buy from brands that offer relevant product recommendations. So, consider displaying similar products as the ones a buyer just purchased. You can also recommend complementary products that go well with their purchase.
Before You Start: Content You Can Add on Your Thank You Page
Your Thank You Page elements should entice visitors to stay on your website for a longer duration or make more purchases. Thus, these elements should be informative, attention-grabbing, and user-friendly.
You can add content on your WordPress Thank You Page, such as:
- Your personalized appreciation message to customers or subscribers.
- A Call-To-Action.
- Visual media, such as images or videos.
- Instructions after completing a desired action.
- Similar or complementary products for cross-selling.
- Discount codes or coupons for future purchases.
- Additional content, whether it’s news, updates, or related blogs or articles.
- Links to your business’ Social Media accounts.
- Customer reviews or testimonials
If you set up a Thank You Page on WordPress, you can build better, more transparent relationships with customers. The best way to create one is by using the SeedProd Page Builder Plugin.
Step 1: Set Up Your New Thank You Page
SeedProd is a WordPress site builder plugin that can construct attractive Landing Pages. It’s also great for adding Short Product Descriptions or Details for WooCommerce. Of course, before creating your WordPress Thank You page, you should have downloaded, installed, and activated SeedProd.
If you’ve very recently activated the plugin, you can scroll down to click the ‘Create Your First Page’ button. It’ll redirect you to the SeedProd dashboard, where you can start the Thank You Page creation process.

Source: SeedProd.
Otherwise, you can head over to the SeedProd tab on the admin panel. You’ll see a few options for Coming Soon Mode and Maintenance Mode. Also, there are options to create a website Login Page and a 404 Page. The Landing Pages section is in the lower half of that tab’s screen, beneath those options.
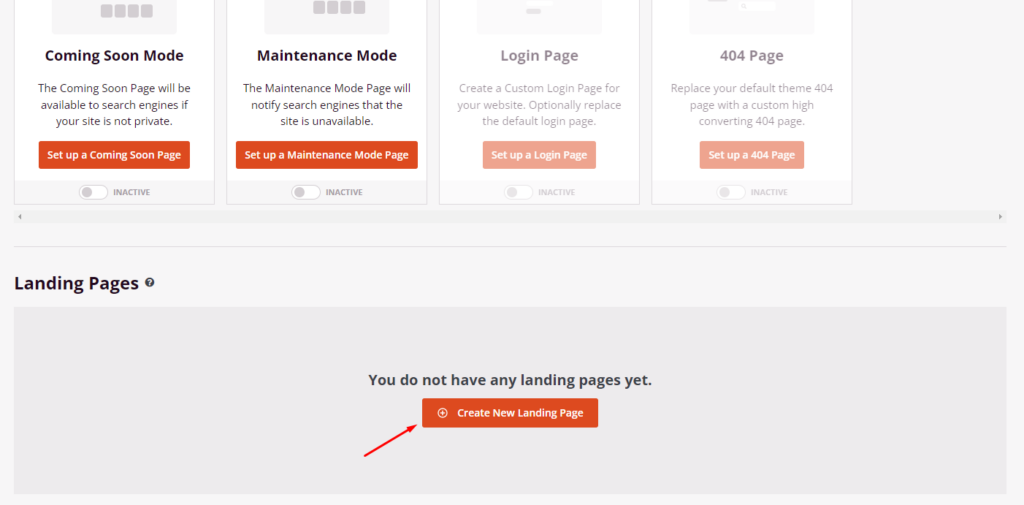
From there, click on the ‘Create New Landing Page’ button to set up a WordPress Thank You Page. After clicking on the button, the template library will appear.
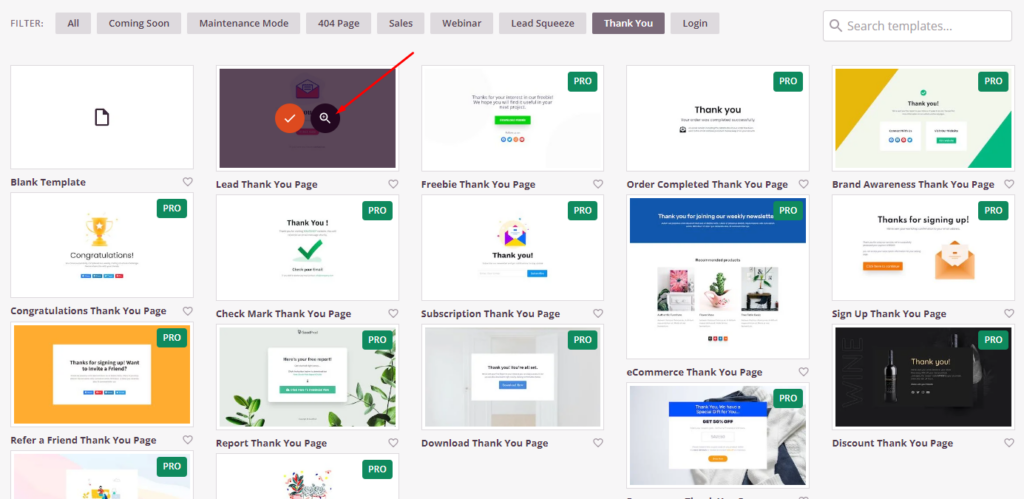
Step 2: Choose a (Landing) Page Template
Seedprod’s template library has over 100 Landing Page templates to choose from. For a more accessible experience, click the ‘Thank You’ button to filter the templates. So you’re left with the perfect options for your WordPress site.
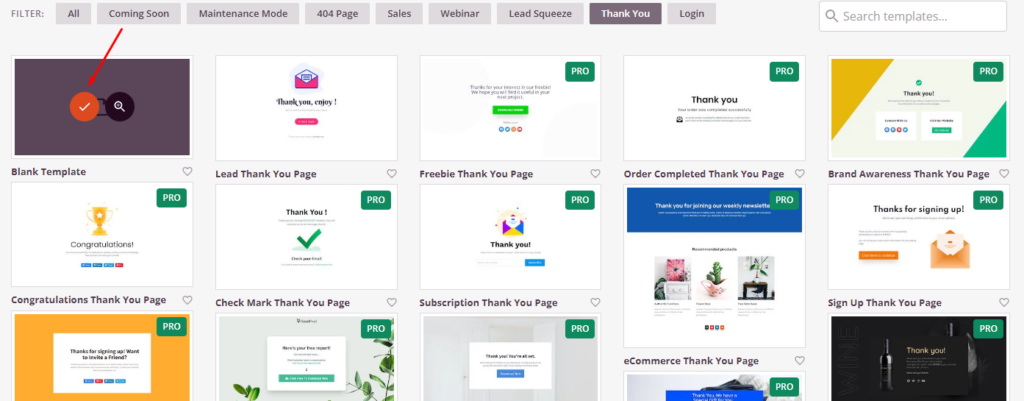
For a better look at desirable templates, you can hover over the preview and click the magnifying glass icon. This option allows you to examine the Landing Page templates’ front-end appearances.
If none of the Landing Page templates catch your eye, you can use a blank template instead. Once you’ve decided on a page template, click the checkmark icon. (It’s right beside the magnifying glass one.)
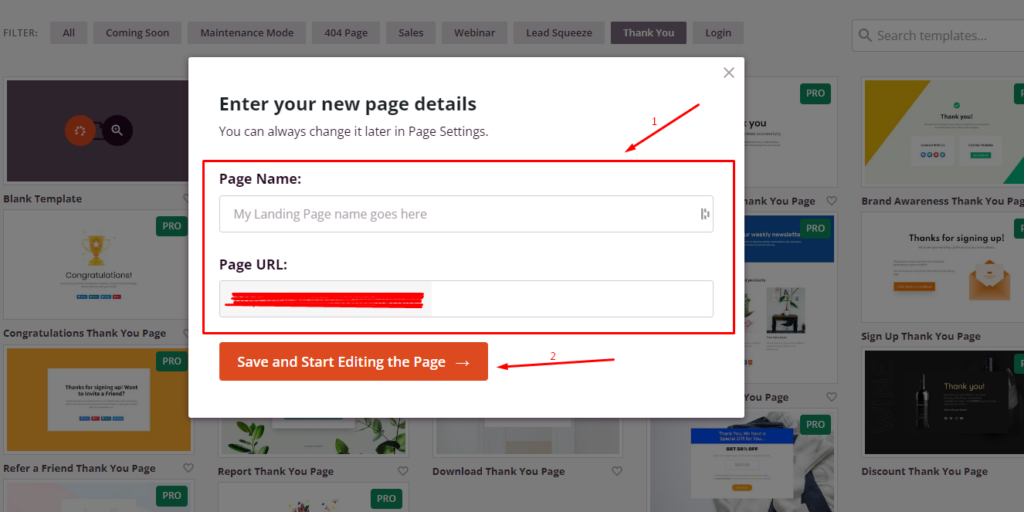
Before you edit your page template, you need to add vital details about your new Thank You Page. These include the Page Name and URL, which you can edit later on via the Page Settings. Next, click ‘Save and Start Editing the Page’ to launch SeedProd’s page builder.
Step 3: Customize the Chosen Thank You Page Template
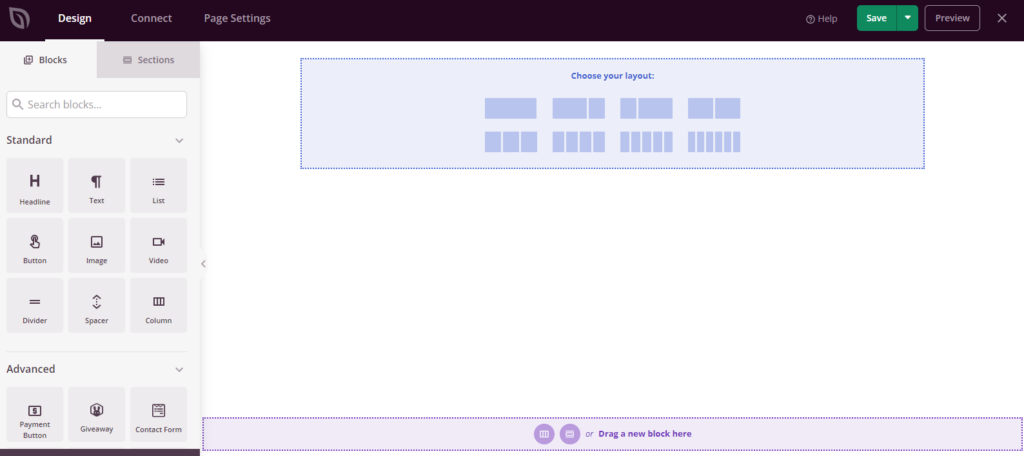
In addition to its ready-to-use templates, SeedProd has a drag-and-drop page builder. Thus, it’s easy for a WordPress Developer from the Philippines to customize a page to your liking with the help of new or existing blocks. With these features, you can add:
- image or video files;
- text;
- contact forms, etc.
You can combine all these elements to create the ideal Thank You Page.
The left side of the page builder contains all the page block options, while the right side is for editing previews. The former has three sections of content blocks. Firstly, Standard contains essential page elements, which allow users to add headings, CTA buttons, etc.
Then, the Advanced section has blocks that are geared towards boosting conversions, such as:
- Countdown timers;
- Social sharing buttons;
- Customer testimonials or social proof;
- Star ratings;
- Opt-in forms; and
- Contact forms.
If you’re an eCommerce store using the WooCommerce platform, you’re in luck! SeedProd has a WooCommerce section that allows you to set up vital features. These can include checkout and carts, which can help you sell more products from your online store.
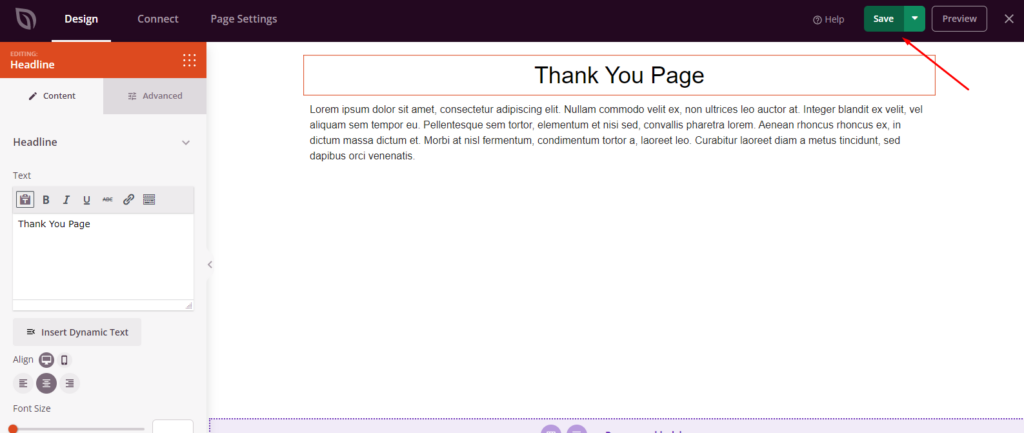
Once you’re satisfied with your Thank You Page, don’t forget to save your changes with the ‘Save’ button.
Step 4: Connect the Page to Your Email Service Provider
Once you’ve set up your Thank You Page to your liking, it’s time to connect to your Mailing List. This step works best if you add a contact form to the page to collect your leads’ information. As a result of this integration feature, you can collect visitor information and grow your Email List.
SeedProd can easily connect to your preferred email service provider. After all, SeedProd has various integrations with email marketing services, including Constant Contact and ConvertKit. They even have integrations with things like Google Analytics and reCAPTCHA!
So, head to the Connect tab to integrate your desired email service. SeedProd offers a large selection of service providers. Click on the preferred provider, then click ‘Connect New Account.’ After making this selection, you’ll see further instructions on how to connect your account.
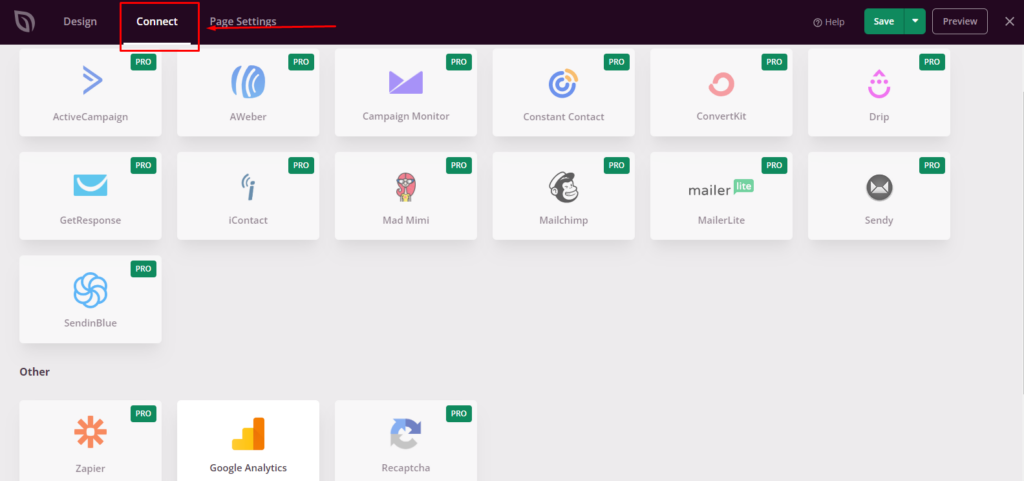
Alternatively, you may be asked to enter your API key. If this is the case, you can find it on your email account dashboard. Once everything is satisfactory, click ‘Save’ to send automated emails.
Step 5: Further Configure the Thank You Page’s Settings
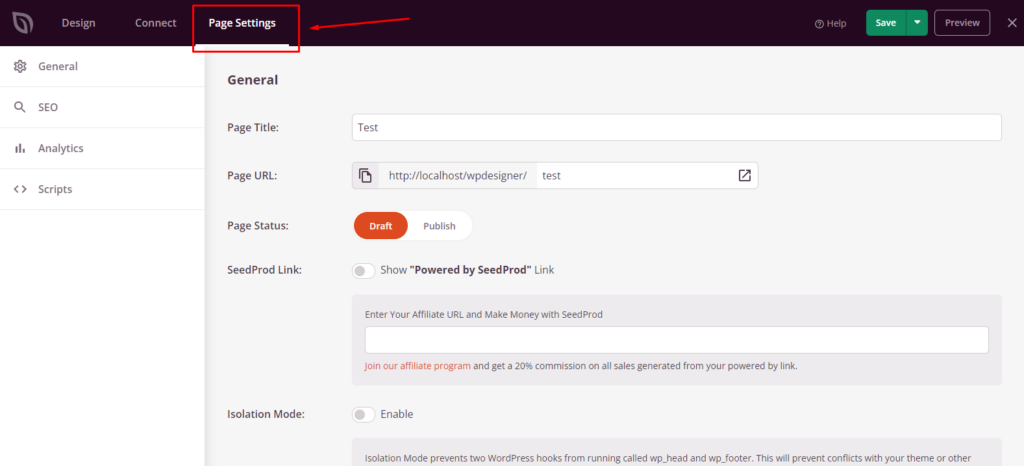
This is the last step before you can publish the WordPress Thank You Page you set up. To customize your Thank You Page settings, you must edit several items. From the Page Settings tab, go to the General Settings section, where you can edit the following:
- Page Title.
- Page URL.
- Page Status. You can set it as a Draft or make it ready for publishing. Also, you can show or hide the “Powered by SeedProd link.”
You can also examine other tabs for the following settings:
- SEO. You can connect your page with the All in One SEO plugin for better search engine rankings.
- Analytics. Additionally, you can integrate the page with MonsterInsights. Thus, you can gain data on traffic and conversion rate reports.
- Scripts. You can add customized code to further modify the page’s style, especially if you’re skilled with codes.
Once you’ve made the configurations, it’s crucial to examine the page’s appearance before publishing it. So, you can use the Mobile Preview tab to check its appearance. After all, there are many benefits to having a mobile version of your website. Once everything is perfect, you can select Save and move on to the next step.
Step 6: Publish the Page
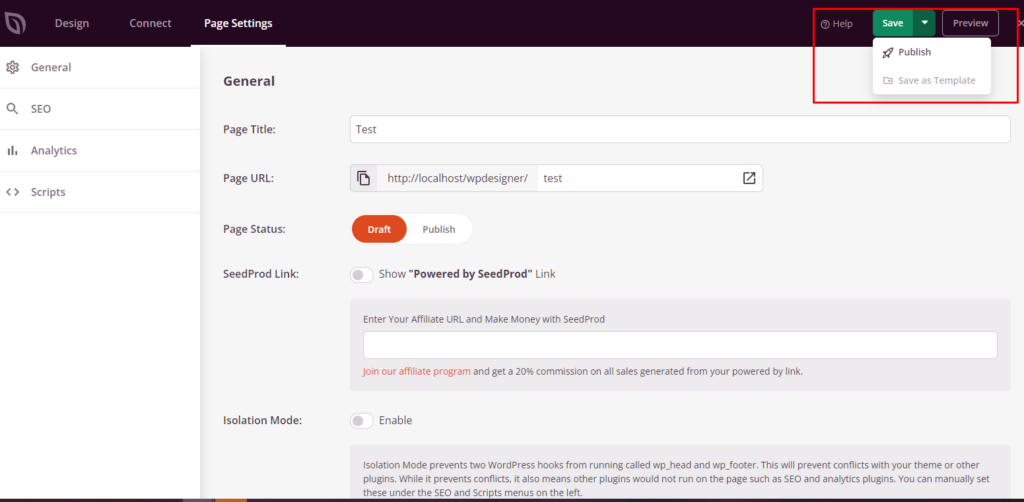
Before the WordPress Thank You Page you created goes live, you should give everything a once-over. Then, publishing the page is as easy as clicking the Save button dropdown menu and the Publish option.
Afterward, you’ll see a notification telling you the page is live. Click the ‘See Live Page button’ to see your handiwork in action.

Final Thoughts
Website owners can use a small popup to thank visitors for doing a desired action. But a Thank You Page can show visitors just how grateful you are to them.
Any business will significantly benefit from Thank You Pages. They’re great for companies that offer services online or sell products. For instance, eCommerce store owners, in particular, shouldn’t ignore the power of a robust Thank-You Page.
You can make your dedicated Thank You Page as straightforward or complex as you like. But, it’s vital to understand that a business’ Thank You Page shouldn’t just contain one sentence of gratitude.
Instead, business sites should show a personalized thank you message for being a customer or email subscriber. Additional content can be instrumental in visitors spending more time on your pages, higher conversions, and better sales.
Consult with a WordPress Developer from the Philippines who can create a WordPress Thank You Page. Improve conversions and increase customer loyalty today!











Comment 0